Powered By Blogger

Wednesday, May 25, 2011

The Habit of Victory (OSG) ~ "The Battle of Eylau"

Game: The Habit of Victory (OSG)
Scenario: The Battle of Eylau
Participants: Bob H, Myself
Time: Sunday, May 22nd ~ 2.00PM - 4.00PM

Bob and I got together to give HoV another try. Each of us had done a little more rules reading. I wasn't completely taken with the game after our last playing. I was a little more interested this time around because we had a bigger force and we would be playing instead of learning.

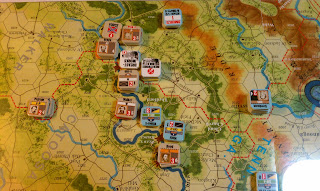
There are only two turns in this scenario, which I didn't fully get as we started playing, the number of days per turn confused me...thus I assumed that I had a few turns to work with. I started my turn by going after the lone unit behind my lines. I have no idea what this unit was doing there, but we double checked the set up and it was correct. Using my orders I moved up Napoleon and the Guard along with the out of position I Corps. I also moved a few Vedette's out to scout out Bobs forces as I had purposely not payed attention to his set up (I wanted to fully experience the whole fog of war effect).

I was able to wipe out the unit in my rear during the combat phase of my first turn. During Bob's turn it dawned on me that I had only one more turn. The Victory conditions are generic, the side with the highest casualties inflicted minus lost is the winner. I wasn't very impressed with this as for new players it didn't really provide any sort of direction or physical objective.

Bob moved up a big force under Bennigsen and attacked my center. Despite Bobs Artillery and Cavalry advantage I held the ground and he took more losses then I. There were two rounds to the battle. I was unenthusiastic about the combat system coming into the scenario and this engagement did nothing to get me excited or to add any sort of 'excitement' to the game...it was all very generic and bland.  Bob fell back and it was my last turn.
Set Up

As we were nearly even on the casualties given and taken, I knew that I would have to go out and attack something in order to even have a shot at winning, the other option of course was to just sit there and watch the birds outside in the trees. I opted, narrowly, to complete my second turn. I grouped up a bunch of units into a big force and marched out and next to the only unit I could attack without engaging more then one hex of Bob's forces. We had a "bigger" uninteresting combat with many more losses this time, Bob taking a bit more I believe. I cant even remember if either one of us had enough of a casualty differential to get a VP, by then we were both so disinterested that we were just going through the motions.

Ney Cleans up some lonely Prussians

Both of us were very neutral on the game and the system. I liked the hidden units and the mechanics in place to gather intelligence via cavalry units...it felt very much like the game with making me use my cavalry as it was used historically. The rest of the system is very competent. I imagine that players of this series usually ignore the battle scenarios and play the campaigns only; as those seem more interesting then the battles. I was really surprised with the victory conditions for the battle scenarios. I would have assumed at least some sort of physical objective for one side to take and hold, something, anything to add to a very dry narrative.

Napoleon and Bennigsen Clash on the last turn

I really liked the historical information included in the exclusive rules. They certainly helped bring me up to speed on the personalities and events of the campaign. Sadly Bob and I are not interested enough to take a shot at one of the campaigns in the game...it goes back on the shelf. 

Monday, May 23, 2011

Dominion (RGG)

Game: Dominion (Rio Grande Games)
Scenario: Repetition (3p), Reach for Tomorrow (3p), The King's Army (4p) and Potion Mixer (4p)
Participants: Jeff "Jeffe" I, Joe "YJ" C, John C and Myself
Time: Saturday, May 21st ~ 11.45AM - 6.15PM

Dominion is highly addictive. It has taken hold in my group in St. Louis. I blame Rikk (aka "The Pirate") my friend in Arizona who out of the blue sent me the game a few months back. In the last month, I have played it with all of my gaming friends and it has proved very popular. Several times we've elected to play Dominion in lieu of a 'real' game. For those of you that are wargamers that might be looking for something to fill in the cracks, or perhaps something that the wife and children would enjoy, Dominion is certainly worth your time. A couple of my friends have played it with their wives, mothers and children...most of the time they (the family members) were the first ones to say "lets play again".

I talked about the game in depth in this (2nd half) post, so I wont spend time here going over the mechanics of the game. I will talk briefly though about the expansions to the game, which we played through this past Saturday. First off there is Dominion: Seaside. Seaside adds cards that have multi-turn effects as well as cards that can add resources to themselves over the course of the game. "Prosperity" adds another layer of victory and treasure cards as well as new cards that are both actions and treasures, or better said treasure cards with perks. Lastly there is "Alchemy" which introduces a new currency to the game (potions). These are the only three expansions that I have played with to date, there is one "Intrigue" that I have and have not played yet as well as a brand new one "Cornucopia" that I do not yet have.

Repetition Deck


Game #1 "Repetition" (Dominion + Seaside) [3-player]

This deck has the "Pirate Ship" in it and I stayed away from it, preferring instead to stick "Caravan" and "Festival" to start off with. YJ and Jeffe caught on quick and this was a tight game.

The Final Score looked like this:

  • Jeffe: 33
  • Myself 30
  • YJ 24
Reach for Tomorrow Deck

 Game #2 "Reach for Tomorrow" (Dominion + Seaside) [3-player]

This is an interesting deck. It had "Treasure Map" in it and we all jumped on those cards early on. Jeffe and I had success getting them played early, giving us an advantage early. YJ was however able to fight back in and got a very close win.

Final Score:
  • YJ 36
  • Myself 35
  • Jeffe 10
Me, John and Jeffe

Game #3 "The King's Army" (Dominion + Prosperity)

John showed up and after some amazing chow (thanks T-Money!!!) we played this very enjoyable deck. There are several attack cards in it and the "Moat" was very popular. Late in the game we figured out that "King's Court" was a huge card. Once we got a few of those in our hands the game drew quickly to a close. I had a lot of luck in that I seemed to have a "Moat" at all the right times. I also got the "Goons" going very early on and they ended up giving me something like 15 victory points. The game didn't end when the "Provinces" ran out, but rather when I (wanting to end it early as Jeffe was coming back on me) bought out the third kingdom pile to end it. The prior turn, I blew a card play, costing me a few coins which I could have ended the game on that turn, Jeffe was able on his last turn to get enough VP's for a one point win...very cool.

Final Score:
  • Jeffe 27
  • Myself 25
  • YJ 11
  • John 11
Jeffe, YJ and YJ's Hair

Game #4 "Potion Maker" (Dominion + Alchemy)

This was our last game of the day and is was pretty good. We all tried to figure out the new cards and the potions, with Jeffe getting it first. Despite this YJ was able to get it going with the "Golems" and in the end between Jeffe and YJ and their damn "Golems (which can extend their turn) it turned into a race between them, while John and I could only watch and wish that we had some dang "Golems" too.

Final Score:

  • YJ 38
  • Jeffe 30
  • Myself 21
  • John 21
Potion Maker Deck in Action

So all in all we had a fantastic time. Jeffe and John played three more games after we left. My thanks to Jeffe for hosting. 

Tuesday, May 17, 2011

The Habit of Victory (OSG) ~ "The Battle of Pultusk/Golymin"

Game: The Habit of Victory (OSG)
Scenario: Battle Scenario #1, The Battle of Pultusk/Golymin
Participants: Bob H, Myself
Time: Sunday, May 15th ~ 2.00PM - 4.00PM

While Bob and I have a large area where we are both interested in similar games or periods, there are also area's where his interests lie that I have not spent much time as a gamer. One of these area's is operational level Napoleonic games. I would also add that this is a fairly small portion of the larger wargaming canvas. I can dimly recall my high school days where I had and tried to play once or twice "The Struggle of Nations" (1982, AH). This game sticks out because of the glorious map and the tiny counters. I have little recollection of my playing SoN other then at the time it was something new and exciting...I was also busy learning Squad Leader and many other AH classics of the era.

So here we are some 30+ years later and Bob and I are learning HoV. This game uses the same system as SoN did, Kevin Zuckers Campaigns of Napoleon System 2X. As I understand it (mostly from Bob) this system has been around quite a while and keeps getting updated and expanded upon. One of the interesting features of this incarnation of it is the use of cards to drive movement and attrition in the Campaign Scenario's. Bob and I did not get to use the Cards though today as we were playing the first battle scenario, and the battle scenarios do not use the cards to drive movement orders (defined in the scenario) or attrition (rolling on a chart).

After Set up

For me, one of the aspects of this hobby that I love is how it exposes me to military history. I have a good broad knowledge of the Napoleonic wars. I have perhaps forgotten more then I know now about the period as in days gone by I have dabbled in various games covering this period. Additionally, my favorite author, Patrick O'Brien chose this era to base his Aubry/Maturin series of books in. So I have a good deal of knowledge of what the RN was up to and some of the more famous campaigns (Waterloo, Spain) but I am nearly clueless on what happened in Central Europe in 1807. I spent a lot of time on wiki reading up on the campaign covered in this game (Napoleon in Eastern Prussia and Poland) as well Mr. Zucker's excellent Historical Notes, Leader Bio's and Bibliography. I am very impressed with his notes on the campaign and love it when a game designer takes the time to add this type of information into the game.


So prior to play Bob and I had both read the basic rules and at least skimmed the advanced rules, which mostly cover the campaign game. Bob had played this solo a few years ago after the game was released. Essentially both of us were brand new to the system and thus this game was really nothing more then us working through the mechanics and learning the system. Not really us "playing" each other, more of combined study of how the game plays.

Initial Contact

So instead of talking about what happened, I'll only go over some initial impressions. We plan on playing the 2nd scenario the next time we get together and I'll have a much more informed opinion of the game at that time. First off, the game is mostly Division and Corps sized Infantry & Artillery units along with Cavalry units (Brigades) and smaller cavalry Vedette's (recon units). The scale is three days per turn and 6km per hex. The troops are represented by strength points in an off map display where they are associated with various leaders and units (divisions mostly). A strength point represents roughly 3,000 infantry. Leaders drive the game and the off map display has all of the relevant leaders on each side as well as their ratings (which will drive initiative and other things).

A big multi-hex battle

The interesting part with this is that nearly all of the units on the map will be face down, that is I will not be able to see Bob's units contents, only that there is a unit there. There are no dummies in the game...so I will refrain from comment on this until we experience the campaign game. The Battle scenarios are smaller covering the three or four major battles fought during the Campaign. These are usually 3-5 turn and each side will have less then a dozen units per side.

In our game we quickly learned that combat in this game can be very costly, with losses varying quite a bit on the lower odds columns. Combat is interesting in that each player with decide the type of battle he wants to fight in secret prior to the combat (basically do I want to hold/take this ground or give ground instead of losses). There is limited intelligence prior to the battle as well and this looks like it'll add some good drama to the game as we decide how to fight with imperfect information (image that in a wargame!). There is also the possibility of pursuit and the defender having to counter attack, adding more drama and excitement/uncertainty to the process (which is good, imho).

All in all I am favorably impressed so far and look forward to our first 'real' playing of this game. One note, as you can see from the pictures, the game is very attractive. I like the map and the counter art very much.

Wednesday, May 4, 2011

Battle Above the Clouds (MMP) - "Crossing Chickamauga Creek"

Game: Battle Above the Clouds (MMP)
Scenario: #2 Crossing Chickamauga Creek
Participants: Bob H, Myself
Time: Tuesday, May 3rd ~ 7.30PM - 9.45PM

Recently Bob, HeavyD and I took an overnight trip over to Chattanooga Tennessee to visit the Chickamauga Battlefield. This naturally got our collective ACW game juices flowing. For me, after ASL the "Great Campaigns of the American Civil War" (GCACW) system is my second favorite game (system). It's been about a year since Bob and I played BATC so we decided to play this one.

We selected the 2nd scenario from the basic game, "Crossing Chickamauga Creek". Neither one of us had played this one before. Bob and I have played GCACW over the years many times. Most recently, we played BATC heavily after it was released. We've played 3-4 scenario's and the CG twice. Each of us loosing as the USA player.  The CSA was able to pin Union Army in after their crossing both times. Despite this, we wanted to try this scenario as it was a small one and it would give us a chance to refresh ourselves with the rules. Additionally we were interested in the battle itself so this was a natural choice.

Initial Set Up, the green dice show the two sets of VP locations the CSA players needs to occupy for the win

The scenario covers the first day of the three day battle. Bragg is trying to get around the Union left and cut them off from Chattanooga. Rosecrans' Army of the Cumberland is positioned closer to Chattanooga then Bragg thinks. For Rosecrans, he's stuck trying to bring his Army North to deal with Bragg's thrust.

The scenario is one turn long, so its short and sweet. Bragg has to get across Chickamauga creek onto some hexes in the midst of the starting Union positions. Bragg has the much larger force, including six infantry divisions and some cavalry. The Union player starts spread out, but has some of the key crossings covered by lighter forces. There are only three Union infantry divisions along with several infantry brigades of the Reserve Corps. The Union player has some nice Cavalry along with "Mounted Infantry", which is a new unit type introduced in BATC.

I take the CSA players as more of the GCACW rules are burned into my brain then Bobs. The CSA player automatically gets the first initiative in this scenario. I activate Walkers Corps with the intention of crossing at Thedford's ford and perhaps Alexander bridge. I roll well for MPs and start off with Liddell's division racing towards Alexander Bridge as I can get Gist's Division and the Artillery across Thedford's ford.

Walkers failed attempt to cross at Alexanders Bridge

Bob standing on Alexanders bridge, I took this from the CSA side of the creek


Liddell's Division attacks Wilder's Brigade (Mounted Infantry, 2SP) and get stopped cold with a 1D result. I think the initial odds were a net +2 on my die roll. I get Gist and the Artillery across Thedford's ford, however they lack the MP's to try an attack (that would have been a massacre) against Wood's division (5SP + completed Breastworks). I loose -3 VP due to the 1SP I take as casualties...not a good start.

I won the next initiative by rolling a 5, thus I am allowed to bring Hood into the game stacked with BR Johnson's Division (10SP). I activate them and roll well, getting 7 MP's I believe. I send Johnson to take Dyer's Bridge, which is covered by two regiments from Wilder's brigade (123IL and 72IN, 2SP). Bob elects to perform a Cavalry retreat, costing me 1MP. I don't have enough MPs left over to make an attack on Minty's Cavalry brigade, however I get the very next initiative and activate Hood + Johnson's division again for an attack on Minty (3SP). Minty, perhaps inspired by Wilders impressive stand at Alexander's bride deftly beats back Johnson's attack, I again suffer a 1D result, loosing three more VP's in the process.

Minty's Cavalry Brigade stops BR Johnson near Dyer's Bridge
 
Thus my attempts to cross the creek in the North are shut down and I am without two divisions for the rest of the scenario as they are now at fatigue 4.  Worse then this though is my -6 VP's lost in these two attacks. I have to get 8 or more VP's for a win in this scenario, so the odds are starting to look long.

Polk takes Crawfish Springs for +10VPs

Bob gets the next initiate and decides to activate Crittenden's XXI Corps. He moves Rosecrans and Van Cleve's division into 3521 blocking Gist from moving into that VP location. Palmer's division (9SP) stays put and build breastworks in hex. Bob gets another initiative and is able to complete Palmer's breastworks. I then get a couple of activations and move Polk's Corps across the creek at Crawfish Spring (hex 3632). This is a risky move as I am giving Bob a flank attack by moving here, but the hex is clear and I have much more artillery then either of Bobs two divisions, making the attack a risky proposition. Having taken a VP location I now gain +10 VPs, making my total +4, still a loss at this point for me.

Bragg leads a two-hex Grand Assault, Routing Palmer's Division

At this point the scenario is all but lost, however we decide to keep going as I want to exercise the Grand Assault rules. I move up Buckner's Corps to make a move against Palmer's dug in troops. Buckner fails his first Assault check, but gets the next one, I then convert it to a Grand Assault and Bragg is only able to bring in one more division from Polks Corps. The final odds are a +2 and I roll well, routing Palmer. However I take another 3-4 SP losses as I am assaulting with 30 SP! At least I get to see the boys in Blue Routed to end the scenario.

Bob and HeavyD plan the days visit outside of Lee & Gordon's Mill


This is a great little one turn scenario. Despite my poor performance, I feel like its pretty balanced and its got a little bit of everything. HeavyD and I will be playing this again this weekend as HeavyD too has ACW fever and needs a GCACW refresher. Then on Sunday, Bob and I will play the full battle scenario (#3).